
Google’s algorithmic bidding system is designed to funnel your budget toward high-performing campaigns and keywords based on conversion data. If Google notices that a particular keyword or campaign is bringing in leads, it’ll ramp up the budget in those areas to maximise your return on ad spend (ROAS).
While this approach is theoretically sound, it’s important to consider that not all leads are equal.
Only a portion move to a sales-qualified stage, and e-commerce keywords and campaigns vary significantly in the value of purchases they drive.
If granular data regarding lead quality and purchase value isn’t provided to Google, the system can’t optimise campaigns to focus on higher-quality leads with a greater likelihood of converting into meaningful sales.
Also, while Google does track online conversions (though it’s far from perfect—especially with the third-party cookie phaseout and lack of multi-channel data), one often-overlooked aspect is how offline conversions fit into the picture.
Even though the world’s gone digital, offline conversions are still a big deal. Think about sales made over the phone, in-store purchases, or leads collected at events like conferences. These don’t happen on your website, but they’re still a crucial part of the customer journey.
Google does let you import offline conversions using CSV uploads and hidden form fields to track click IDs, but it’s prone to errors. More importantly, it doesn’t capture phone calls or any prior touchpoints in the customer journey, making it tough to get a clear view of what’s actually working.
For example, if a conversion is generated by a different source, such as SEO or organic social media, you’d be unable to determine whether or not your campaign played a part in that offline conversion.
One way to tackle these challenges is by leveraging offline conversion data through a first-party data platform like Ruler. It tracks click IDs for all online conversions, not just form submissions, and uses multi-touch attribution to capture the full picture.
Ruler then matches these conversions with your CRM data and sends advanced signals—like when leads hit key stages like MQL and SQL—back to ad platforms via the Offline Conversions API. This allows Google to use the CRM data and automatically activate campaigns that target prospects that are more likely to progress to an advanced stage of the customer journey.
This playbook will guide you through how a first-party platform like Ruler captures the GCLID and GBRAID from your landing page URLs, linking them to individual visitors and their activities, such as closing deals in your CRM and attributing revenue to those actions.
Also, it explains how to automate the upload of offline conversion data directly to Google Ads, simplifying your workflow and ensuring that Google receives accurate, real-time data.
Step 1: Enable auto-tagging in Google Ads
Ruler’s integration with Google Ads makes it easy to send offline conversions using GCLID or GBRAID whenever specific events happen in Ruler.
Before getting started, you’ll need to make sure auto-tagging is turned on in your Google Ads account.
This is essential for Ruler to track your GCLID (or GBRAID) and link everything properly.
To check this, just head to your Google Ads account, navigate to Admin > Settings, and look for the auto-tagging option.
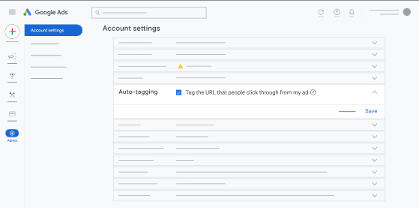
Make sure the box is checked, and you’re good to go! This small step ensures your data flows seamlessly.
Step 2: Authenticate your Google Ads setup
You’ll get an invite from Ruler Analytics to connect your Google Ads API.
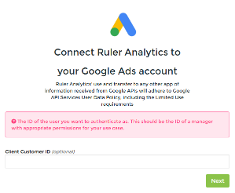
Just make sure the Customer ID you provide is for the account where you want us to create conversion goals and send data.
You can find your Customer ID in the top-right corner of your Google Ads account by clicking on your display picture.
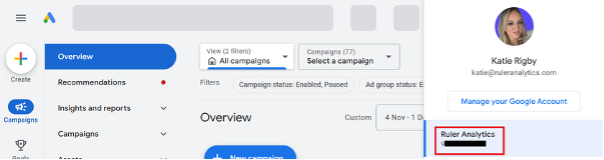
If you’re using a Manager (MCC) account, click the down arrow next to the MCC account name in the top-left corner.
The Customer ID for each account will show up in the dropdown. Double-check you’re using the right one, and you’re all set.
Step 3: Send conversion data using the API
Now that the authentication is sorted, it’s time to send offline conversion data to your account.
We use the Google Ads API for this, and you’ve got two options:
- Let Ruler handle it: Connect the API, and we’ll automatically create the conversion action for you using our default settings. It’s quick, seamless, and hassle-free.
- Do it yourself: If you’d rather set up your own conversion actions (like if you have specific settings in mind), that’s totally fine. Once they’re ready, Ruler will sync with those conversion events via the API.
Let’s dive into the steps for both options.
Option 1: Let Ruler automatically create events in Google Ads
Ruler can set up the right conversion actions in your account based on what you need. It’s the easiest option with minimal effort on your part—we basically handle the tricky stuff for you.
For example, say a lead from one of your Google Ads campaigns turns into a deal in your CRM. Ruler can link that deal back to the right campaign and keyword, then automatically send the revenue data straight into Google Ads. That way, you can see the results right where you need them.
To set this up, you’ll need a Google Ads offline conversion for each event you want Ruler to track. Ruler can help configure these goals in your Google Ads account through our integration.
Here’s what actions Ruler sends to Google Ads:
Please note: We can change the name of your conversion goals, please let us know prior to setup if you wish to rename the goals.
| Event Type | Default Conversion Name |
| New Phone Call | Ruler Phone Call |
| New Opportunity Stage | Ruler Opportunity (If you wish to send separate events per opportunity stage, you can create the event as per the stage name – please just update your account manager who can update your configuration) |
| New Revenue | Ruler Revenue |
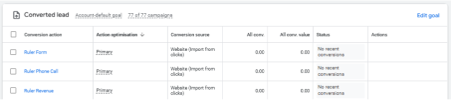
By default, these actions will be created as Secondary conversion goals. Once the data sync is confirmed, you can change them to Primary if needed.
To update your Google Ads settings:
- Go to Admin > Conversions.
- Edit the goal.
- Change the Action dropdown to Primary.
Once confirmed, data should begin to sync and show in your Google Ads report within 24 hours of configuration.
Option 2: Manually setup conversion events
Ruler makes it easy to automate the creation of your Google Ads conversion events, but you can also set up your offline conversions manually if you prefer. Either way, you’ll have two options for sending your data to Google Ads:
- Set up an automated daily upload via API
- Manually upload a sheet daily
Ruler supports both methods and can help you choose the one that works best for your setup and reporting needs.
The API method is fully automated and usually the way to go. We only recommend the manual upload if there are any challenges with using the API (like permissions or account management issues).
For this example, we’ll stick with the API method since it’s the easiest. But if you’re curious about manual uploads, feel free to reach out to the team—we’re happy to help!
e time-consuming and repetitive, particularly when dealing with large datasets.
Here’s how you can set up conversion events in Google Ads:
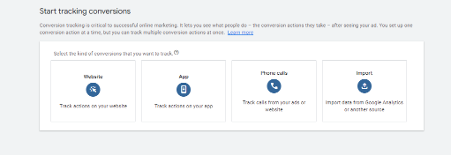
Go to Create > Conversion Action.
Choose Import as the Conversion Type.
Select CRMs, Files, or Other Sources > Track conversions from clicks.
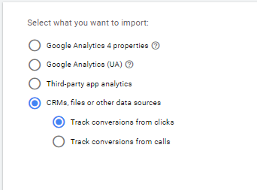
Next, you’ll need to pick a data source, and this is the point the two methods go their separate ways.
For Data Source, choose Skip this Step. Ruler uses the Google Ads API, so you only need to pick a Data Source if you’re using Google Sheets Import—which we’ll get to shortly.

Next, you’ll configure your conversion goal. Most of this is up to your reporting preferences, so feel free to adjust as needed.
When naming your conversion, choose the conversion action “other” and make sure to follow the settings based on the event you’re sending from Ruler.
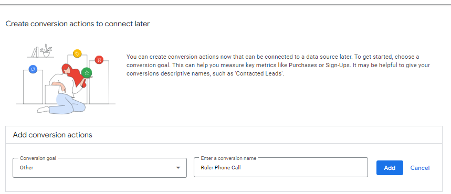
We listed these earlier on, but as a reminder, they are:
- Ruler Phone Call
- Ruler Opportunity
- Ruler Revenue
You may also have the option to mark the conversion as ‘primary’ or ‘secondary’—we recommend setting it to ‘secondary’ at first so you can double-check the data while you’re setting up your tracking.
If you want to automate a daily upload using the API, just save the new Conversion and reach out to your onboarding manager—they’ll help set up the data transfer from Ruler through the Google Ads API.
Step 4: Benefit from improved data, reports, and targeting
Once you’ve set everything up, your data should start syncing and showing up in your Google Ads reports within 24 hours.
From there, you can start seeing the benefits:
Better targeting: By sending in data on qualified leads and closed deals that have generated revenue, your targeting becomes more precise. Instead of just focusing on form fills, which can often be unqualified and overlooked, you can optimise your campaigns with confidence based on better, more accurate data signals.
Insights into campaign performance: Sending revenue data to Google Ads allows you to see the true impact of your keywords and campaigns. This helps you understand which ones are driving actual revenue, not just conversions like form submissions, offering a clearer view of your ROI.
Higher ROAS and increased budgets: In an era of tighter budgets, providing data that shows how your campaigns and keywords directly contribute to revenue can be crucial. Marketers can leverage this data to boost ROAS and make a strong case for maintaining existing budgets or even securing additional funds to scale successful campaigns.
Need help getting started with offline conversion data in Google Ads?
Offline conversion data is key for ad platforms to figure out which users, campaigns, and keywords give you the best ROAS.
If you want to automate the upload of offline conversions to Google Ads from your CRM with a tool like Ruler, book a demo and we’ll show you how easy it is to streamline the process and boost your results.