
Integrate your Google Ads and Salesforce account for better algorithmic targeting and in-platform reporting.
Running Google Ads for a service or high-ticket product? Then you already know that a click doesn’t always mean an instant sale.
More often than not, it’s just the start of a journey—one that could lead to a phone call, an in-person meeting, or a chat with your sales team before the deal is closed.
If you’re using Salesforce to track Leads and Opportunities, there’s a way to connect the dots between your online ad spend and your actual revenue.
By linking your Google Ads account with Salesforce, you can import conversion data, get clearer insights into how your ads drive offline sales, and even let Google optimise your campaigns with more accurate data.
In this blog, we’re going to show you how to get started by covering:
- Why you need to integrate Salesforce and Google Ads
- How to prepare for the Google Ads and Salesforce integration
- How to send data using the Salesforce native integration
- How to send data to Google Ads using multi-touch attribution
💡 Pro Tip
Hidden fields are a common way to capture GCLID and pass data from Salesforce to Google Ads, but they have their downsides. They only track the last touchpoint and can get lost if a visitor navigates between pages before submitting a form.
First-party data platforms like Ruler offer an alternative by tracking the entire customer journey—picking up marketing sources, UTM tags, click IDs, and cookie IDs along the way. When someone converts (through a call, form, or demo), it connects the dots between digital touchpoints and conversion details, syncing pipeline and revenue data straight to its dashboard for accurate ROI tracking.
Then, it automatically sends all that data to Google Ads, so you’re always working with the latest insights—no extra effort needed.
Skip ahead to learn more or book a demo to see it in action
Why integrate your Salesforce with Google Ads?
If you’re wondering whether it’s worth integrating Salesforce with Google Ads, the short answer is: absolutely. There are two big reasons why sending offline conversion data to Google Ads can make a huge difference.
Related: How to connect Salesforce to Google Analytics 4
1. Google Ads only tracks digital conversions
Let’s start with the obvious. Just because the world is digital doesn’t mean every sale happens online.
Whether it’s a deal closed over the phone, an in-store purchase, or a lead captured at an event, these offline conversions are a crucial part of the customer journey.
Related: Your guide to Google Ads offline conversions
Google Ads, by default, only tracks online conversions. And with third-party cookies disappearing and multi-channel tracking becoming trickier, even that data isn’t perfect.
If you’re not feeding offline conversions into Google Ads, you’re optimising your campaigns based on an incomplete picture—meaning you could be missing out on real revenue-driving insights.
2. Not all leads are equal (but Google doesn’t know that)
Google’s automated bidding system works by funnelling your budget into the campaigns and keywords that drive the most conversions. Sounds great, right? Well, not always.
The problem is, not all leads are created equal. Some might be tyre-kickers who never progress beyond an initial enquiry, while others turn into high-value customers.
If Google doesn’t have data on lead quality and purchase value, it can’t properly optimise your campaigns.
By sending pipeline data from Salesforce to Google Ads, you help Google focus on the leads that actually matter—driving better results and a higher return on ad spend (ROAS).
Before you begin the Salesforce with Google Ads integration
Before you dive into connecting Salesforce with Google Ads, there are a few key steps to check off. Getting these right from the start will save you time (and potential headaches) down the line.
1. Make sure you have the right salesforce permissions
To integrate Salesforce with Google Ads, you’ll need a Salesforce user account with specific permissions. At a minimum, make sure your account can:
- View and modify Leads and Opportunities (since conversion tracking relies on these).
- Create and manage custom fields (to store Google Click ID—GCLID—and track conversions).
- Enable field history tracking (to log changes in key fields).
- Access APIs (if you’re using API-based integration instead of manual uploads).
- View and modify reports and dashboards (to track imported conversion data).
Your Salesforce account must also be part of Sales Cloud, where lead and opportunity tracking happens.
The easiest way to ensure you have all necessary permissions is to use an Administrator account. If that’s not an option, work with your Salesforce admin to create a custom role with the right permissions.
2. Enable auto-tagging in Google Ads
Next, make sure auto-tagging is turned on in Google Ads. This ensures that Google adds a GCLID (Google Click Identifier) to your ad URLs.
Related: What is GCLID auto-tagging in Google Ads and how can you use it?
Without it, Salesforce won’t be able to link leads back to specific Google Ads campaigns.
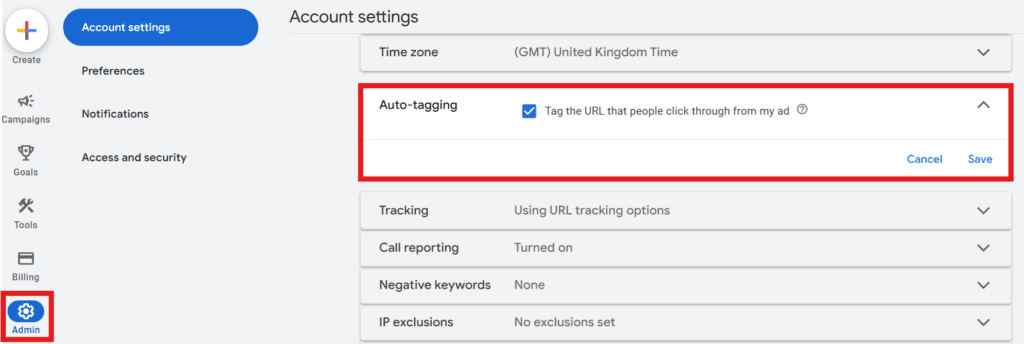
To check or enable auto-tagging:
- Go to Admin in Google Ads.
- Click the Account Settings tab.
- Find the Auto-tagging section.
- Select “Tag the URL that people click through from my ad.”
- Click Save.
GCLID is essential for tracking which ad, keyword, or campaign brought a visitor to your site.
When a lead fills out a form, the GCLID is captured and stored in Salesforce, allowing you to trace conversions back to Google Ads.
3. Set up lead capture (Web-to-Lead or other solutions)
You also need a way to capture lead data—including the GCLID—and send it to Salesforce. A few common options:
- Salesforce Web-to-Lead: A built-in feature that collects lead info from your website and stores it in Salesforce.
- Marketing automation tools: Platforms like Ruler Analytics, HubSpot, or Marketo, can capture lead data and pass the GCLID to Salesforce—we’ll get to that later.
Without a solid lead capture setup, your Google Ads integration won’t work as expected, and you won’t be able to track conversions properly.
Now that you’ve got the groundwork sorted, it’s time to connect Salesforce with Google Ads and start syncing your data.
How to send data using the native Salesforce and Google Ads integration
First, let’s walk through how to set up the native Salesforce and Google Ads integration.
After that, we’ll cover third-party tools and how they can help overcome some of the limitations of the native integration.
Step 1: Set up your Salesforce account & web-to-lead form
To track Google Ads conversions in Salesforce, you need to create a custom GCLID (Google Click ID) field in your Lead or Opportunity objects. This unique ID allows Google Ads to match conversions back to specific ad clicks.
Setting this up involves a few technical steps, so if you’re not comfortable with Salesforce configurations, it’s worth bringing in a developer or CRM manager.
Create a GCLID field in Salesforce
- Go to Setup in Salesforce.
- In the Quick Find box, search for Object Manager and select the Lead object.
- Create a new custom field with the following settings:
- Field Type: Text
- Field Length: 255 (this is usually enough for GCLID values)
- Field Label: GCLID
- Field Name: gclid
- Save the field.
Modify your web-to-lead form
If you’re already using a Web-to-Lead form, you’ll need to add a hidden field to capture the GCLID. If you don’t have one, you’ll need to create it:
- Go to Setup in Salesforce.
- In the Quick Find box, search for Web-to-Lead and select it.
- Click Create Web-to-Lead Form (or Manage Web-to-Lead if modifying an existing form).
- In the form builder, ensure you have all necessary fields (Name, Email, etc.), plus a hidden GCLID field.
- After generating the form, copy the HTML code and locate where form fields are defined. Add this hidden field inside the form:
<input type=”hidden” name=”gclid” id=”gclid”>
- To ensure the GCLID is captured from the URL and stored in this hidden field, add the following JavaScript code before the closing </body> tag of your form page:
<script type=”text/javascript”>
function getGclid() {
var urlParams = new URLSearchParams(window.location.search);
var gclid = urlParams.get(‘gclid’);
if (gclid) {
document.getElementById(‘gclid’).value = gclid;
}
}
window.onload = getGclid;
</script>
- This script will check if a GCLID is present in the URL, and if it is, it will populate the hidden field with that value.
Map the GCLID field in Salesforce
Once your Web-to-Lead form is capturing GCLID data, you need to map it to the custom field you created in Salesforce:
- Go back to Setup in Salesforce.
- Open Web-to-Lead setup and find the field mappings section.
- Map the gclid field from the form to the custom GCLID field in Salesforce.
Test your setup
Before rolling it out, you’ll want to check that everything is working properly:
- Visit your Web-to-Lead form with a GCLID in the URL (e.g., https://yourwebsite.com/form?gclid=123xyz).
- Fill out and submit the form.
- Go to the Leads tab in Salesforce and check that the GCLID is stored correctly in the custom field.
This setup can be quite technical, so if you’re unsure, it’s best to get a Salesforce admin or developer involved. If you need more details on Web-to-Lead forms, check out our full guide here: Salesforce Web-to-Lead Forms.
Step 2: Link up Salesforce and Google Ads
Now that your Salesforce setup is tracking GCLID data, the next step is to connect Salesforce with Google Ads. This integration allows you to import offline conversions—such as proposals sent, negotiation, or closed deals—back into Google Ads.
By doing so, you’ll get a clearer picture of how your ad spend translates into actual revenue.
Connect Google Ads to Salesforce
To begin, you need to link your Salesforce account to Google Ads so that conversion data can be shared between the two platforms.
1. Log in to your Google Ads account.
2. In the navigation bar, click on Tools (the wrench icon).
3. Select Data manager and + Connect product

4. Find Salesforce in the list and click on it. Go for the direct connect option and click authorise.

6. Enter your Salesforce username and password. If you’re not the Salesforce admin, you may need their credentials or ask them to assist you. Also, ensure that API access is enabled for your Salesforce account—this is required for data syncing.
7. Click Save to complete the connection.
Once your Salesforce and Google Ads accounts are linked, you can now set up conversion tracking.
Choose Salesforce events to track as conversions
After linking the accounts, you need to decide which Salesforce events should be counted as conversions in Google Ads. Since Google Ads typically tracks online actions (like form submissions), you can tell it to count offline actions like:
- Proposal Sent – The lead has received a quote.
- Negotiation – Sales discussions are in progress.
- Closed Won – The sale has been successfully completed.
These offline conversion actions will be imported into Google Ads to give you a better understanding of which ads and keywords are actually driving revenue.
Set up conversion tracking in Google Ads
Once you’ve selected the Salesforce events to track, you need to configure them in Google Ads.
1. Open Google Ads and go to Goals.
2. Click on Conversions > Summary.
3. Find the conversion action you want to edit or create a new one.
4. Click Manage under Data Integration to adjust settings.
Here, you can customise several options:
- Update the Salesforce Link: Click Update Link, log in with your Salesforce credentials, and save changes.
- Rename the conversion action: Click Edit Name, enter a new name, and save.
- Set the sync frequency: Click Edit Schedule to adjust how often Google Ads imports conversion data from Salesforce (e.g., daily or weekly).
- Modify what counts as a conversion: Click Edit Event Condition to define which Salesforce milestones should trigger a conversion in Google Ads.
- Adjust data mapping: Click Edit Mapping to modify how Salesforce fields are matched with Google Ads.
- Add a new Salesforce event as a conversion: Click Add Event to track additional actions in the sales funnel.
If you don’t want to wait for the next scheduled import, you can force a manual data sync.
All you need to do is click ‘Run Now’ to push the latest conversion data from Salesforce into Google Ads.
Just remember, If you add a new conversion action, wait 4–6 hours before uploading data to ensure the changes take effect properly.
How to send multi-touch data from Salesforce to Google Ads
Google Ads and Salesforce have made it pretty easy to connect data, but there are a few limitations you should be aware of.
The default method of using GCLID and hidden fields in forms is mostly focused on last-touch attribution.
That’s because Salesforce’s GCLID-based tracking only stores one GCLID per object, meaning it only considers the last ad click before a conversion. But the customer journey is rarely that straightforward.
People interact with multiple ads and touchpoints before making a decision, and relying solely on last-click data can leave you with an incomplete picture.
For example, customers might click on a Google ad early in their journey but convert later through another source (like organic search, email, or direct traffic). Using hidden form fields, there’s no way to know that.
Also, Google Ads isn’t just about form fills. It also drives phone calls and live chat enquiries.
Since hidden form fields only capture online form submissions, those other interactions won’t be tracked in Google Ads, leading to incomplete data for optimisation and reporting.
A first-party data platform like Ruler helps overcome these challenges by tracking the entire click path journey at the visitor level.

Here’s how it works:
- Tracks every touchpoint – Ruler logs the marketing source from each session, including UTM variables, Click IDs, and Cookie IDs.
- Connects online and offline conversions – Whether a lead converts via phone, form submission, or a demo, Ruler links all digital touchpoints with the conversion details.
- Syncs with Salesforce (or any CRM) – Instead of just capturing the last click, Ruler maps out the full journey and updates the lead/contact record with all relevant interactions.
Related: How Ruler enriches your Salesforce CRM
- Feeds revenue data back to Google Ads – Once a lead turns into a deal, Ruler syncs that revenue data back to Google Ads, ensuring your ROAS calculations are based on actual revenue, not just last-click conversions.
- Updates other ad platforms – If a contact moves from MQL to SQL, Ruler can pass that updated data to Meta Ads too, keeping your targeting fresh.
With a first-party data solution like Ruler, you get a much clearer view of how Google Ads fits into your customer journey—without the manual work.
Plus, with better data, you can optimise your campaigns more effectively and improve your return on ad spend (ROAS).
Do you need help integrating your Salesforce and Google Ads data?
Integrating Salesforce data with Google Ads can take your marketing to the next level—from smarter audience targeting to more accurate reporting inside Google Ads.
Sure, Salesforce’s native integration and web-to-lead forms are a good starting point, but they miss the bigger picture.
The customer journey is rarely a straight line, and relying only on form submissions means you’re ignoring crucial interactions like phone calls and live chat enquiries—which are just as important as form fills.
First-party data tracking fills these gaps by capturing the entire customer journey, not just the last click.
Syncing all marketing touchpoints into Salesforce ensures every lead has a full history, whether they come from a form, call, or chat. This complete data then feeds back into Google Ads, allowing for more effective campaign optimisation and improved ROAS.
Ready to connect the dots? Book a demo with Ruler and see how it works.