
Become better equipped to track marketing revenue in Google Analytics 4 and start making better decisions about where to spend your budget.
Gone are the days when shorter customer journeys and tracking lead volumes were enough to prove marketing success.
Today, with the pressure to do more with less, marketers have to show clear ROI or risk losing their budget.
One way to do this is by using ecommerce tracking in Google Analytics 4 to keep tabs on revenue from purchases. Another common approach is assigning values to key events to track non-ecommerce conversions such as lead forms.
But the most effective approach?
Using a first-party data platform that captures the full user journey. These platforms collect rich marketing source data such as, click IDs, cookies, UTM parameters, page views, and connect them directly to high-intent conversions like form fills, phone calls, and live chat inquiries – but more on that shortly.
In this post, we discuss:
- How Google Analytics revenue tracking works
- How to track eCommerce revenue in Google Analytics
- How to track revenue for non eCommerce transactions
- What are the limitations of Google Analytics revenue tracking
- Alternative way to track marketing revenue
💡 Pro Tip
While Google Analytics offers a basic revenue tracking solution for leads, its static values can’t capture the nuances of customer journeys. Different channels contribute leads of varying value, and the increasing complexity of the modern customer journey means Google often misattributes conversions to BOF activities.
Ruler addresses these limitations by tracking data at the visitor level, accurately attributing leads and revenue to the right campaigns, ads, and keywords. Its probabilistic measurement model also ensures that credit is attributed fairly to the channels that truly drove conversions and revenue.
Book a demo to see how ruler attributes revenue
What is Google Analytics 4 revenue tracking?
As a marketer, you should always be proving why your work matters to your company, and using revenue tracking in Google Analytics 4 is one way to get started.
Revenue tracking lets you see the marketing channels, landing pages, and keywords that are driving the most monetary value for your business.
Related: What is revenue marketing and complete guide on how to get started
Instead of focusing on metrics such as CPC (cost per click) or CPL (cost per lead), revenue tracking allows you to hone in and measure more meaningful metrics such as CPA (cost per acquisition) and ROAS (return on ad spend).
Revenue data lets you get a more accurate view of your ROI, allowing you to make more data-driven decisions to optimise your marketing for maximum results.
If anyone knows, it’s us at Ruler. We’ve helped many organisations gain a single source of truth into their marketing ROI with marketing attribution.
Ruler helps businesses understand how their marketing efforts contribute to pipeline and revenue in the CRM. It does this by tracking the customer journey over multiple marketing touchpoints.
Related: How to view the full customer journey with Ruler
When a user closes into a deal, the revenue generated is attributed back to the marketing channels and touchpoints that drove the conversion, allowing you to optimise your marketing campaigns and make better decisions about where to allocate your budget.
More on Ruler shortly, for now…
How to track eCommerce revenue in Google Analytics 4?
If you sell products online, then Google Analytics 4 can easily track your marketing revenue.
A little bit of code in your shopping cart, and you understand which of your marketing sources are driving the most sales for your business. If you’re using Shopify, WordPress or Squarespace, you can use their built-in integrations to send transaction data to Google Analytics 4.
Below are the steps to send transaction events to Google Analytics 4 using Google Tag Manager.
💡 Important Note: For this demonstration, we’ll assume that you’ve already set up your GA4 tracking tag on your website.
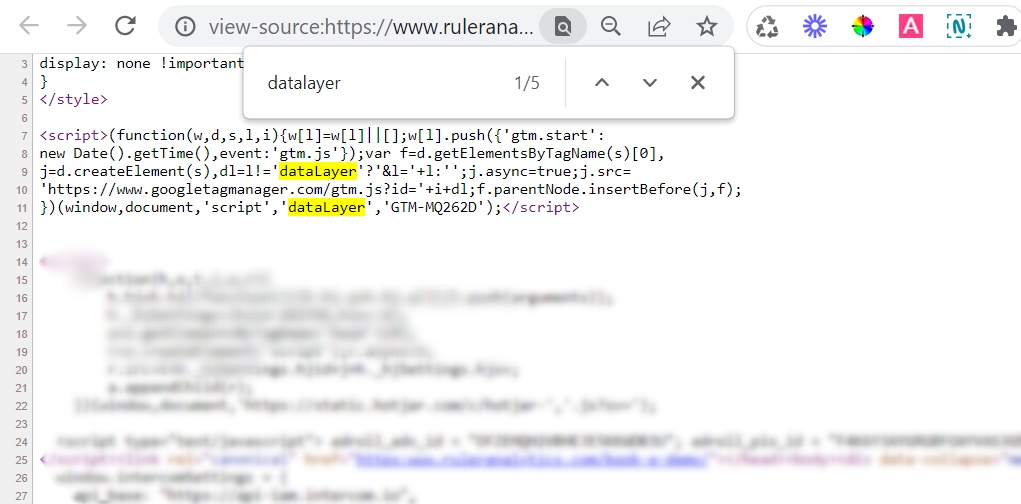
1. First you need to ensure that your data layer includes relevant details for your transactions. To do this, your best option is to make a demo purchase on your website, expect the source and search for “data layer” to check everything is in working order. If all looks good, your next job is to to configure Google Tag Manager to send these details to GA4.
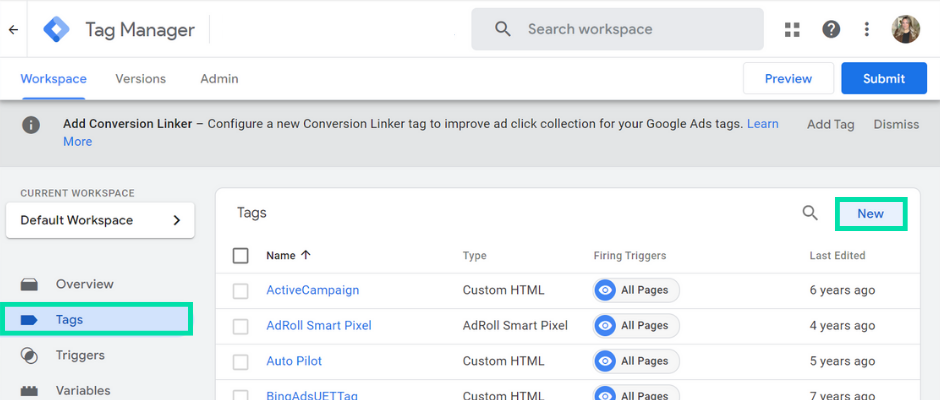
2. Head over to Google Tag Manager and select tags. To send purchase details to GA4, you’ll need to set up a new tag. Select New.
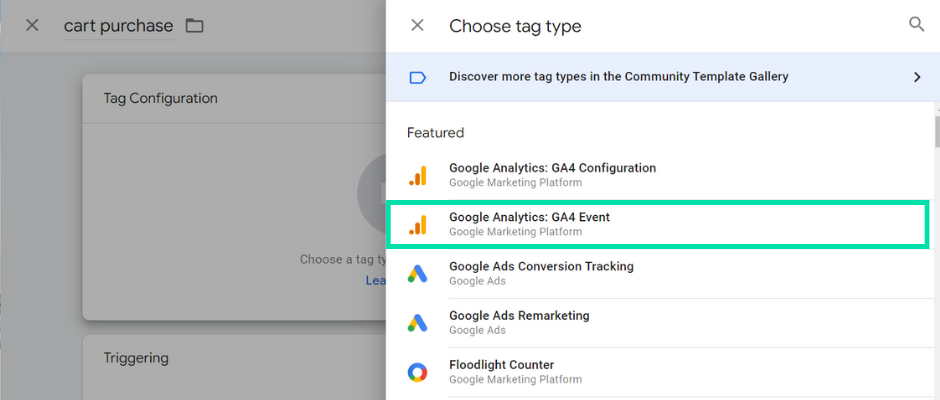
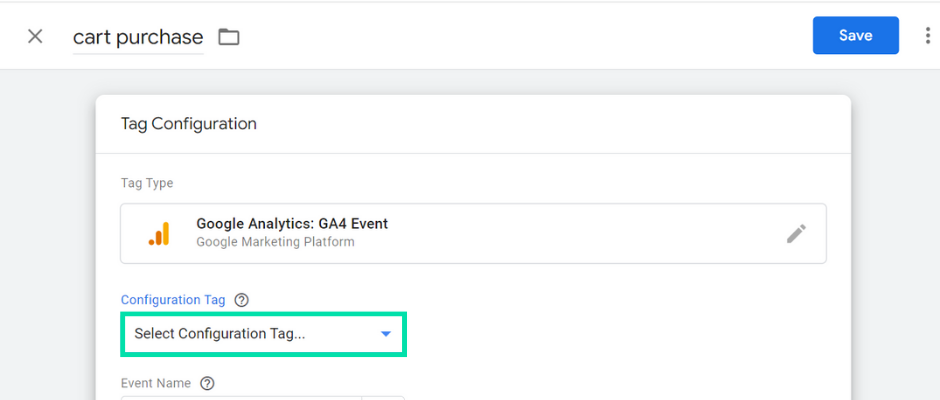
3. Name the tag, select Tag Configuration and choose GA4 Event as the tag type.
4. Select your existing GA4 conversion tag using the drop-down.
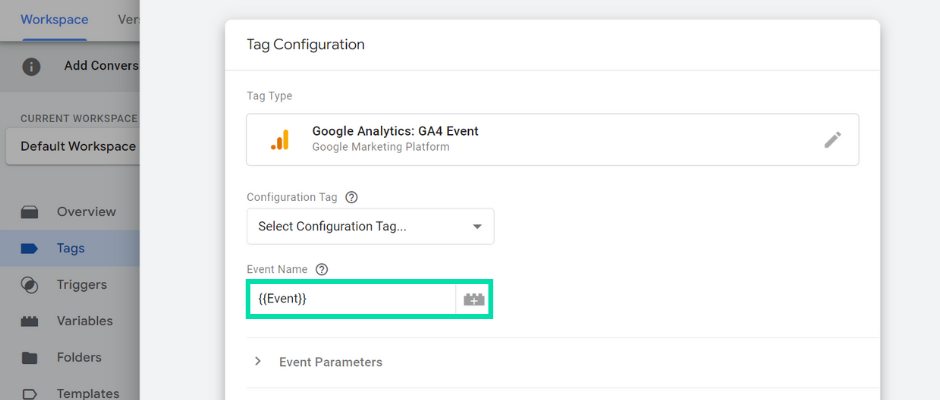
5. Click the variable icon under Event Name and Choose Event. This will pass the name of the data layer event into your tag.
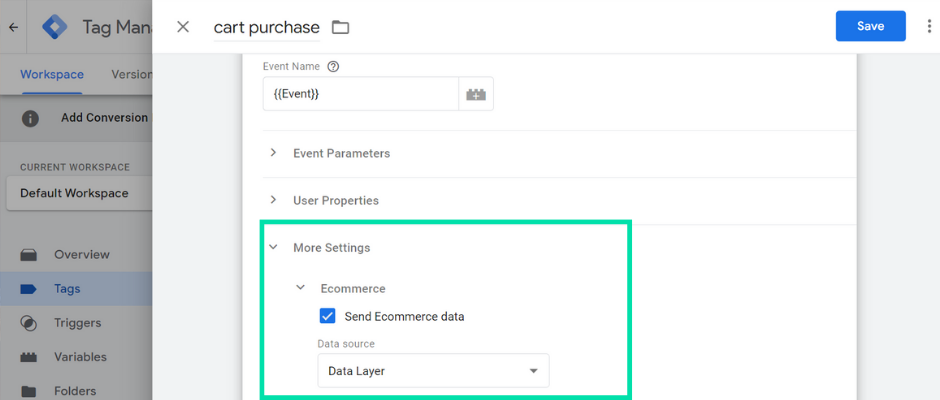
6. Next, select More Settings and enable “Send eCommerce data”. Ensure that “Data Layer” is selected in the drop-down. This option will allow you to automatically collect ecommerce details from your data layer and send them to GA4 along with the event.
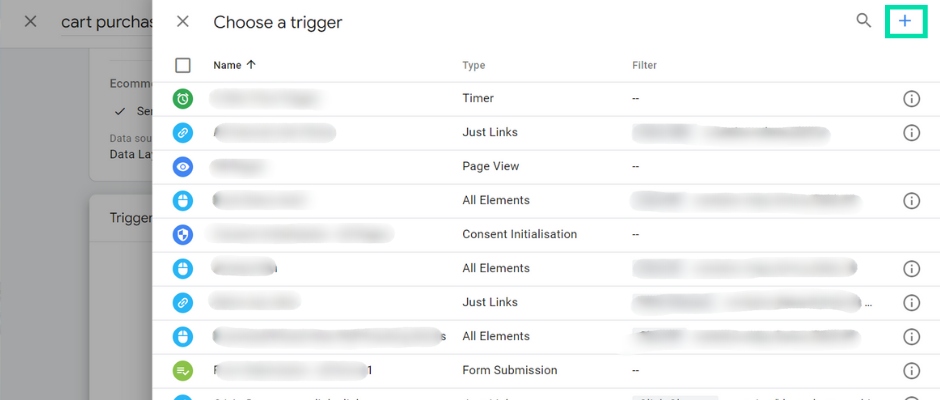
7. Now it’s time to add a trigger to your tag. Select the pencil icon on Triggering. Here you’ll need to set up a trigger that will allow us to fire out tag our ecommerce actions. To do this, click the blue plus sign in the top right corner.
8. Give your trigger a name and select Trigger Configuration. Scroll down and click Custom Event.
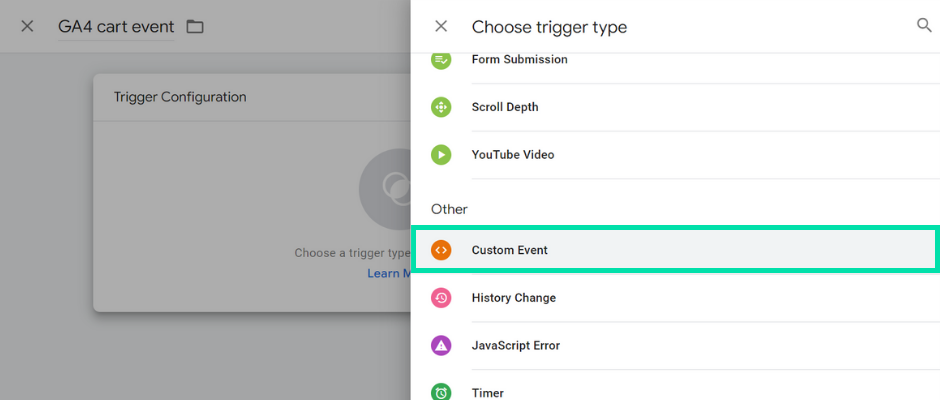
Now you need to enter the data layer event names you want to use to fire the tag. Google has list of recommended events you can use:
View_item|view_item_list|select_item|add_to_cart|remove_from_cart|view_cart|begin_checkout|add_payment_info|add_shipping_info|purchase
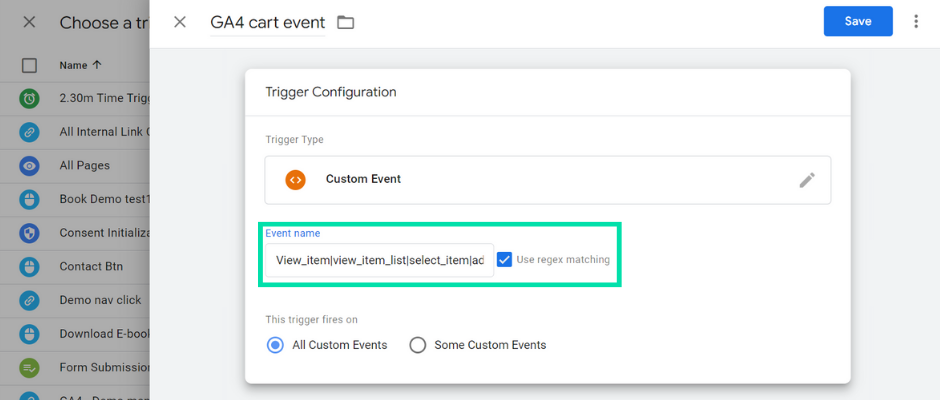
Each one is separated by a pipe. If you enable the User Regex Matching option, Google Analytics will recognise the pipes as regular expressions. If you only want to trigger your GA4 event for some of these listed events, you can adjust the regular expression.
9. Now save the trigger and the tag.
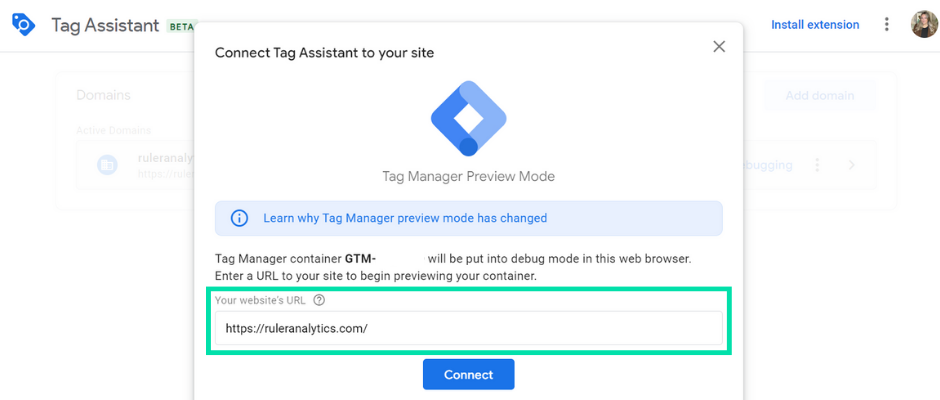
10. Before you go any further, it’s best to preview your tag. To do this, click Preview, enter the URL for your store and hit Connect.
11. Add an item to your cart and purchase it. Once complete, click the Tag Assistant tab. Select the purchase event and select the tag. If set up correctly, you should be able to see the details for the activity in your Google Tag Manager.
12. To check it’s working in Google Analytics 4, go to Configure > Debug view. Here you can see if the purchase event has come through to your GA4 property or not.
Once set up, you can benefit from ecommerce transaction data across your reports in Google Analytics 4.
💡 Pro Tip
Limitations in GA4 – like masked user identities, tight attribution windows, and missing impression data – can make it hard to measure true marketing impact on revenue. Our approach bridges those blind spots using a mix of first-party data, media mix modeling, and incrementality testing to give you a fuller picture of what’s really driving your results.
Explore our measurement framework to see how the pieces fit together
How to track revenue in GA4 for non-eCommerce transactions
What if you don’t sell any products but instead use your website to generate leads?
There are a few ways to track revenue in Google Analytics for non-eCommerce transactions, but the easiest method is to set up conversion values.
With conversion values, you can quantify the monetary impact of each conversion and better estimate your ROI.
Setting up conversion values includes the following steps:
- setting up conversion tracking
- sending in cost data
- adding values to conversions
In this guide, we’ll assume that you’re already tracking conversions and cost data in Google Analytics 4 and jump straight into step three.
If you haven’t got round to step one or two, don’t panic.
For events, we’ve laid out all the steps from start to finish in our guide on tracking key events in Google Analytics 4. We also have a detailed walkthrough on how to add cost data to Google Analytics.
Below are steps on how to add key event values in Google Analytics 4.
Head over to Admin > Data Display > Key Events.
Find the key event you’re interested in, click the three dots next to it, and select “Set default key event value.”
From there, you can pick your currency, enter the value, and hit save.
If set up correctly, these event values should appear across your Google Analytics property in the relevant reports.
You can use the key event value data in GA4 to track which advertising efforts offer the highest return and optimise your marketing for maximum revenue.
What are the limitations of revenue reporting in Google Analytics?
Google Analytics has made it possible for companies to measure the effectiveness of their marketing based on revenue, but it isn’t perfect. Let’s take a look at why.
1. Not all conversions are created equal
GA4 values are static by default, which means they don’t automatically update to reflect changes on your website.
For example, if you manually assign a value of £50 to a lead, Google Analytics will attribute that same amount to every conversion, regardless of where the lead came from or how valuable it actually is.
This approach may work well for single-product businesses with fixed pricing, but it becomes limiting for service-based or customizable offerings where lead value can vary significantly.
In B2B environments especially, not all leads are created equal. Some may have a high potential deal size, while others might never convert. Assigning a single static value to all leads can distort your revenue insights and affect decision-making.
2. Only focuses on online events
One of the key limitations of Google Analytics, particularly in B2B environments, is its inability to effectively track offline conversions. While GA4 can capture form submissions and online interactions, it loses visibility once a lead moves offline.
In many B2B journeys, initial engagement happens digitally, through a form fill, whitepaper download, or webinar signup, but the actual conversion occurs later, during a phone call, product demo, or even an in-person meeting.
These critical touchpoints are entirely missed by Google Analytics 4, creating a gap between marketing activity and real revenue outcomes. As a result, marketers may undervalue high-performing channels or misattribute credit, simply because GA4 can’t connect offline actions back to their original source.
3. Limited attribution options
Attribution in Google Analytics 4 helps you credit the marketing channels driving traffic and conversions to your site.
In GA4, the max attribution window for acquisition events is 30 days (like first_open and first_visit), while for other events, it can go up to 90 days.
The average lead-to-close time is 102 days in B2B. If you’re in B2B and relying on Google Analytics, chances are you’re missing out on multiple marketing data points that played a key role in driving leads and revenue.
Related: Marketer’s guide to Google Analytics attribution
It gets trickier—Google Analytics 4 and Google Ads have dropped most attribution models, leaving only last-click and data-driven. While this shift aims to provide more accurate insights, many marketers worry it gives Google too much control over their data.
4. Undervalues the impact of upper-funnel performance
One of the most significant limitations of Google Analytics 4 is its tendency to undervalue the importance of upper-funnel marketing.
While GA4 is undoubtedly a powerful tool, it often struggles to accurately track the full customer journey, particularly when it comes to the early stages.
If you’ve been relying solely on GA4 for your marketing insights, you’ve probably noticed a majority of your conversions are attributed to direct and Google Search.
This isn’t necessarily because these channels are performing exceptionally well, but rather because GA4 has difficulty accurately tracking impression-led platforms.
The problem lies in the complex nature of modern customer journeys.
Users often discover products or services through multiple channels, including social media, display ads, and content marketing.
Additionally, privacy regulations and browser restrictions have made it increasingly difficult to track user behaviour across different channels.
Using a first-party data platform to track marketing revenue
Considering the limitations – like restricted attribution models, missing offline conversion data, and the absence of impression tracking – it’s clear that while Google Analytics offers many benefits, it falls short in fully capturing your revenue and ROI.
As mentioned in the introduction, there’s an alternative worth exploring: a first-party data platform.
Tools like Ruler offer a way to collect and connect data across touchpoints using first-party tracking.
It enables you to collect and connect data across the full customer journey using first-party tracking tags.
By capturing key details such as click IDs, UTM parameters, and page views, it can follow anonymous visitors across sessions and more accurately attribute conversions.
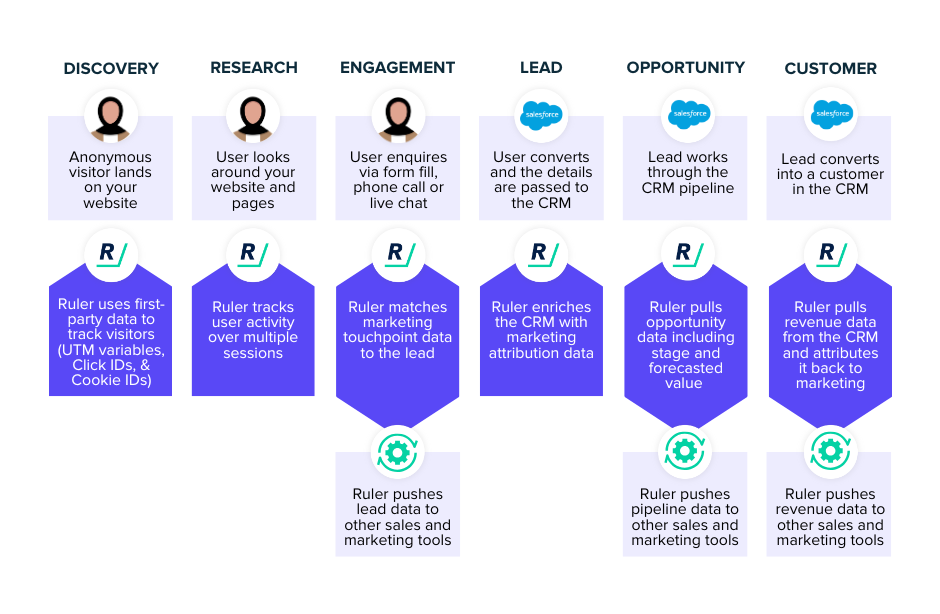
When a visitor converts, whether through a form, phone call, or live chat, Ruler can tie that action back to their earlier interactions. This provides a much more complete view of the customer journey, surfacing touchpoints that tools like GA4 might overlook.
Even better, this conversion data can be pushed into your CRM or lead management system, making it easier to track how leads progress through your funnel over time.
Another major advantage is the extended attribution window.
Unlike GA4’s limited lookback period, Ruler allows you to connect revenue to earlier touchpoints – even if the sale happens weeks or months after the initial visit. It also integrates ad cost data from platforms like Google Ads and Meta, giving you a clearer picture of ROI and ROAS.
More importantly, Ruler can also attribute value to ad impressions – those passive, non-click interactions that still influence behavior.
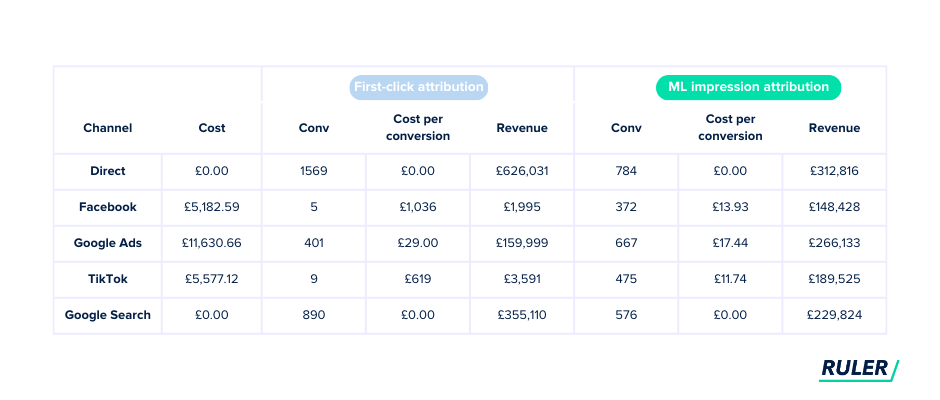
This helps credit top-of-funnel and impression-led channels like TikTok and Meta more fairly, rather than overvaluing last-click channels like direct or organic search.
Final thoughts on revenue tracking in Google Analytics 4
Google Analytics has undoubtedly been a reliable and popular tool, especially in the eCommerce industry.
Its comprehensive features and user-friendly interface have made it a stepping stone for countless businesses in understanding their revenue streams.
While Google Analytics provides some valuable data on revenue generation, it is built with eCommerce in mind.
As we’ve discussed, it’s not the most reliable tool for businesses that use various lead generation methods or experience long and complex user journeys.
But with attribution tools like Ruler, you can track how each visitor interacts with your marketing, where they’re converting on your website and whether they convert into revenue (or not).
Want to learn more about Ruler? Book a demo and see it for yourself. See how it tracks your revenue and attributes it back to your different marketing touchpoints and traffic sources.
Google Analytics revenue FAQs