
Tracking your Facebook conversions in Google Analytics lets you know, with complete certainty, whether or not your advertising efforts are generating real value for your business.
For most businesses, the ultimate goal of an ad campaign is to generate lucrative opportunities that will eventually convert into paying customers.
If you’re not using Google Analytics to track your Facebook conversions, then you’re missing out on a wealth of data that can help drive more effective decision making.
We’re sure you can agree that tracking conversions in Google Analytics is key when it comes to scaling the profitability of your campaign, or else, you would not have clicked through to this blog.
But what’s the most effective way to track Facebook conversions in Google Analytics?
Well, stick around, and we’ll show you how!
For this article, we’ll discuss:
- The importance of tracking Facebook conversions in Google Analytics
- Inconsistencies between Facebook and Google Analytics
- Tracking Facebook Conversions in Google Analytics
- Assigning revenue to Facebook conversions with the closed-loop reporting
💡 Pro Tip
Does the data in Facebook not match the numbers you see in Analytics? We reveal the most common reasons that lead to data inconsistencies between Facebook and Google Analytics and provide recommendations to help make your reporting more accurate.
Solve the data mismatch between Facebook and Analytics
Importance of tracking Facebook Conversions in Google Analytics
Is it even worth tracking your Facebook conversions in Google Analytics?
Well, if you want to gain a holistic view of the performance of your marketing, then the simple answer is yes.
Facebook can only tell you what happened before an ad was clicked, whereas Google Analytics can provide you with more insight on user behaviour metrics and allows you to compare performance against other marketing channels.
Inconsistencies between Facebook and Google Analytics
Facebook has a reputation for making itself look as valuable as possible to the advertiser to encourage more spending.
So, in most cases, Facebook will set out to report a higher number of conversions than Google Analytics.
With that said, before you track your Facebook conversions in Google Analytics, you must take the time to understand the common discrepancies between each platform, so that you don’t jump to the wrong conclusions when it comes to measuring the performance of your marketing.
For now, we’re going to focus on the discrepancies that directly impact your conversion tracking.
That said, we do have an article that lists more discrepancies between Facebook and Google Analytics which well help you become better equipped when it comes to measuring your marketing effectiveness.
Differences between Facebook and Google Analytics attribution models
When it comes to conversions, Facebook will automatically attribute credit to the ad a lead viewed or engaged with.
💡 Pro Tip
Get more familiar with attribution modelling on Facebook and learn how to gain a more unified view of your marketing performance.
Facebook attribution setting explained
Even if a click didn’t take place, Facebook would still reap the rewards.
For example, let’s say a person sees a Facebook ad promoting your product, but doesn’t make a click. Later that day, they type a brand search into Google, click on a paid ad and complete a purchase.
What channel deserves the credit?
It all depends on what analytics you choose.
Facebook would attribute this conversion to the ad the person saw, whereas as the default model in Google Analytics would allocate credit to the Google Paid touchpoint.
While we’re on the subject, we have a blog on how to measure your impact on marketing with Facebook Attribution, which we think you may enjoy.
Facebook limited to a 7-day attribution window
Due to changes in data tracking, Facebook can no longer offer a 28-day window for click-through conversions and is now limited to a 7-day attribution period.
By default, Google Analytics provides you with a lookback window of 30-days.
Although the concept of the 7-day attribution model is to provide you with a more realistic view of the performance of your ads, this change to Facebook’s data policy has only widened the gap between the conversions you see in Facebook and Google Analytics.
Google Analytics can’t track view-through conversions
As we’ve just discussed, the conversion report on Facebook uses a default 7-day window for click-through conversions and a 24-hour window for view-through conversions.
Google Analytics is only capable of tracking click-through conversions.
To add injury to insult, Facebook doesn’t differentiate between the two types of conversions. So, both click-through and view-through conversions are combined into one single data point.
How to track Facebook Conversions in Google Analytics
Let’s take a look at how to track lead conversions from Facebook in Google Analytics.
Typically, these are identified in Google Analytics when a user lands on a confirmation page after completing an action on your website.
There are five steps to track and measure your conversions in Google Analytics.
1. Create a goal in Google
2. Install Facebook Pixel on your website
3. Create a custom conversion in Facebook Ad Manager
4. URL tracking
5. Track conversions throughout the Google Analytics reporting suite.
If you’ve already set up your Goal in Google Analytics, then you can move onto the next step. If not, stick around, as we kick off this guide by showing you how to set up a Goal in Google Analytics.
💡 Pro Tip
Did you know that you can assign CRM revenue to your Facebook conversions in Google Analytics? All conversions for that matter. All you need to do is download the guide below to get started.
How to unlock marketing revenue in Google Analytics
Step 1: Create a Goal in Google
To get started, you’ll need to create a Goal in Google Analytics.
For this example, we’re going to track leads that come from Facebook. To keep things easy, we’ve set up a destination goal. Whenever a user completes a form on the website, they’ll get directed to a confirmation/thank you page where Google Analytics will record this as a conversion.
1. Sign into your Google Analytics account click on “Admin” and go to “Goals“.
2. Click “+New Goal“.
3. Select “Custom” from the menu and click on “Continue“.
4. Give your Goal a name, select “Destination” and click on “Continue”.
5. Add the URL of your confirmation page to “Equal to”. Once you’ve done that, you can hit “Continue”.
Step 2: Install Facebook Pixel on your website
Note: If you’ve already created a Facebook pixel, then you can move onto the next section.
The Facebook pixel allows you to collect data that allows you to optimise ads for better performance and build targeted audiences for future campaigns.
More importantly, however, it allows you to track activity from all pages on your website back to your ad manager account.
Here’s how to set up:
1. Go to “Events Manager“, click “Connect data sources” and select “Web“.
2. Select “Facebook pixel” and click “Connect“.
3. Type in your “Pixel Name“.
4. Enter your website URL to check for easy setup options.
5. Click “Continue“.
Now that you’ve created your pixel code, you’re ready to upload this onto your website for more effective tracking.
There are three ways to upload your Facebook pixel:
- Manually add the pixel to website
- Use partner integration
- Email instructions
For this example, we’ve chosen to manually upload the pixel. Check out this guide for further instruction on how to implement your pixel using the other alternative methods.
6. Go to the Events Manager and select the pixel you want to set up.
7. Click “Continue pixel setup“.
8. Select “Install code manually“.
9. Copy the pixel base code.
10. Find the header of your website or locate the header template in your CMS or web platform. Paste the base code at the bottom of the header section, just above the closing head tag.
Step 3: Create a custom conversion in Facebook Ad Manager
Custom conversions allow you to track actions on specific web pages, in this scenario, your destination page.
For this example, we’re tracking leads, more specifically, form completions. For this custom conversion, we’re going to use the same URL we used to step up our Google Analytics Goal earlier on in this setup.
1. Go to Events Manager and select “Custom conversions“.
2. Select “Create custom conversion“.
3. Give your conversion a name and add a description. Also, ensure that your “Data Source” matches the pixel that you set up earlier. Under “Rules” ensure that you have “URL” selected from the drop-down menu. Next, click on “Contains” and switch this with “Equals“. Now, add your URL and click “Create“.
Step 4: Create custom URL parameters
Google Analytics has trouble differentiating between organic and paid posts.
URL parameters are a simple, yet effective method to help bridge the gap between the data you see on Facebook and Google Analytics.
The most common (and easiest) way to generate URL parameters for your Facebook ad campaign would be to use Campaign URL Builder.
Make sure to use “facebook” as the Campaign Source and “paid” in Campaign Medium.
This should help differentiate your paid traffic from any organic content you’ve shared on Facebook. Also, remember that URL parameters are case sensitive, so avoid using capital letters and spaces where possible.
Step 5: Tracking conversions in throughout Google Analytics
If you’ve set up the step above correctly, then you’re ready to track your Facebook conversion throughout the Google Analytics reporting suite.
Once you set your campaign live, you can head on over to Google Analytics to track user behaviour and see how users from Facebook engage with your website.
You can find this data under “Conversions” under “Reporting“.
Or, to compare performance against your other channels, you can navigate to the “Acquisition” report.
Assigning revenue to Facebook conversions with closed-loop reporting
Hopefully, you now have a better grasp on how to track the performance of your Facebook conversions in Google Analytics.
Although, there’s just one more matter that we’d like to address.
Once you start tracking conversions in Google Analytics, you’ll need to start thinking about how you’re going to evidence the ROI of your advertising campaigns.
Related: How to measure your PPC ROI
Tracking the number of conversions from Facebook is important as it can help lead to smarter marketing decisions, but it’s important to remember that your Facebook conversions aren’t yet “sales”.
If your goal is to drive more conversions, in the hope they’ll turn into revenue one day, then conversion tracking in Google Analytics isn’t enough.
It’s for this reason why we developed our solution to help advertisers track their marketing revenue in Google Analytics.
Related: How to track your marketing revenue in Google Analytics
Ruler is a closed-loop marketing attribution solution which aligns revenue from your CRM with marketing activity so that you can track your customers’ touchpoints, both online and offline, to measure and attribute value accurately across the entire sales cycle.
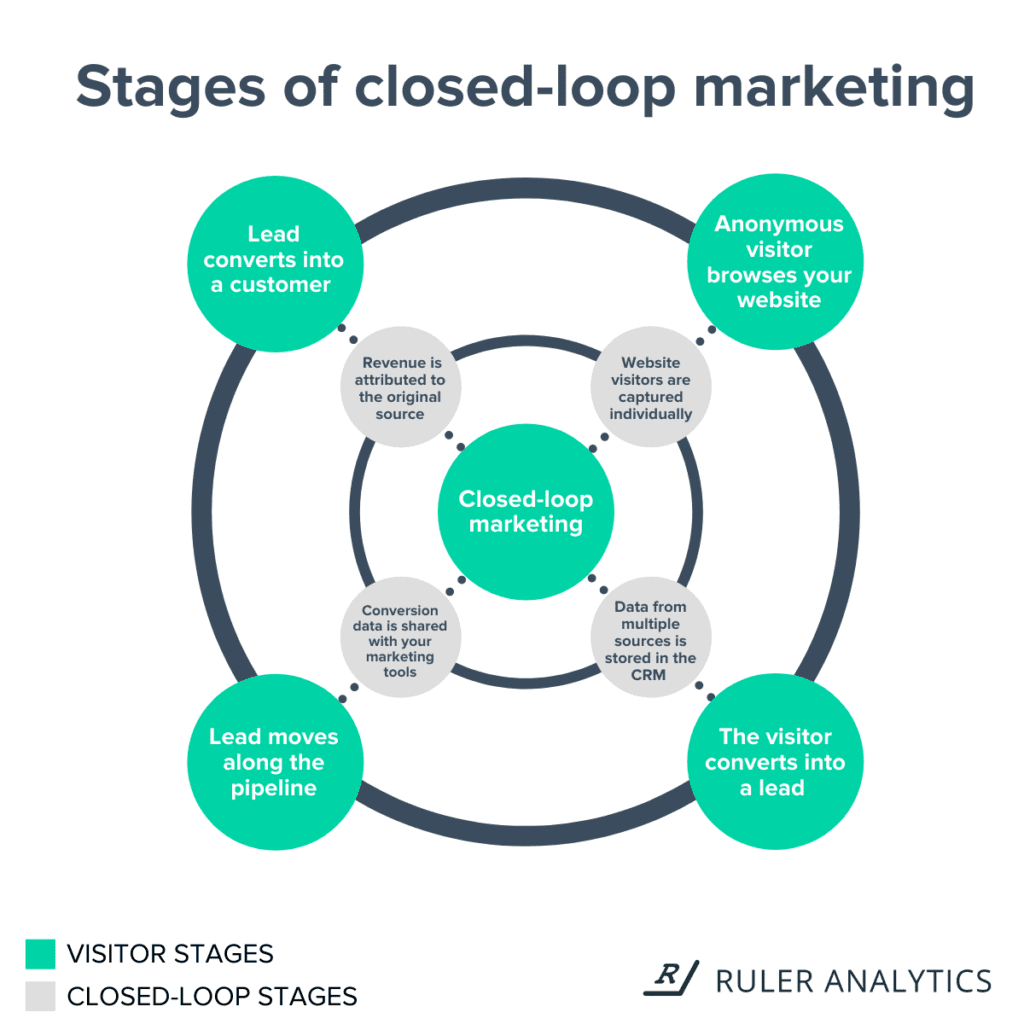
Here’s how it works:
1. Anonymous users engage with your marketing campaigns and ultimately land on your website. Ruler Analytics tracks each anonymous visitor individually, and records how that user found your site and tracks any subsequent visits to or interactions with other marketing channels and campaigns.
Related: How to view full customer journeys in Ruler
2. Whenever a visitor converts via phone call or form fill, Ruler will send that conversion data to your CRM. We used Insightly for this example, but Ruler can integrate with 1,000+ products, such as Salesforce, Hubspot or Pipedrive.
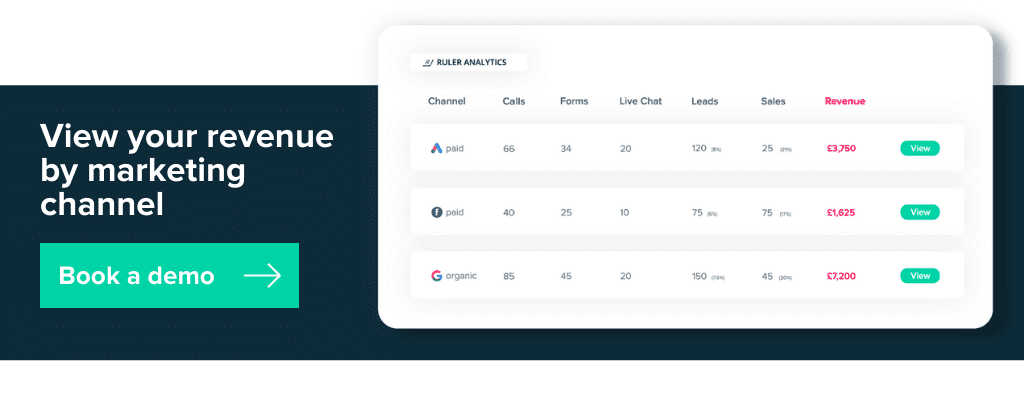
3. When sales convert your Facebook leads into revenue, that data is then sent from your CRM to the Ruler Analytics dashboard. This gives marketers a complete view of how many conversions they’re generating and exactly how much revenue those conversions brought in. You can see exactly how much revenue different channels and campaigns generate.
Related: How Ruler attributes revenue to your marketing
4. You then have the option to send Facebook revenue from Ruler to your Google Analytics account. Allowing you to compare the performance of your marketing based on real value and not just the number of conversions generated.
Ruler is also capable of tracking phone calls that were generated from Facebook. We won’t go into that here as we have an entire guide dedicated to tracking offline Facebook conversions.
Need help measuring your conversions in Google Analytics?
You need to ensure that your Google Analytics and Facebook accounts work together so that you can gain a better understanding of the performance of your advertising campaigns.
Using a tool like Ruler, you can go beyond simple conversion tracking in Google Analytics and attribute revenue directly to your Facebook campaigns.
Which, in turn, will allow you to manage and scale budget into the areas that have the potential to drive more revenue.
Learn more about Ruler and how it can help optimise your paid strategy or book a demo to see it in action for yourself.
This article was originally published on 10th November 2020 and was last updated on 11th February 2022 for freshness.