

Send UTMs and attribution data to Salesforce and track which channels and campaigns are most effective at driving leads and revenue.
As a marketer, you’re likely aware of the importance of UTMs for measuring marketing performance.
UTMs help you track which channels are driving the most traffic and conversions in tools like Google Analytics and Ads. But there is more to marketing measurement than just tracking clicks and conversions.
By capturing UTMs and attribution data in Salesforce, you can take your measurement a step further and track how each marketing channel contributes to the overall customer journey and revenue.
In this guide, we’re going to show you four different ways to track UTMs in Salesforce and discuss the pros and cons of each method so you’re better equipped to choose the right method for your business.
Here’s what we’ll cover:
💡 TL;DR
Capturing UTMs in Salesforce gives you visibility into which marketing channels are most effective in driving traffic and converting leads and sales on your website.
Hidden fields are a common way to transfer UTMs to Salesforce, but they have limitations. UTMs in hidden fields typically only consider the last touchpoint in the journey and are often lost when a visitor clicks from one page to another before submitting the form.
Attribution tools offer an alternative and more convenient way to track UTMs in Salesforce. Ruler, for example, tracks the entire customer journey at the visitor level on a first-party basis, including the marketing source from each session, page views, UTM variables, Click IDs, and Cookie IDs. When a visitor becomes a lead, the marketing source and UTM data associated with their conversion are automatically sent to Salesforce and linked to the lead record.
Book a demo to see how Ruler integrates with Salesforce
What are UTMs in Salesforce?
UTMs (Urchin Tracking Module) are parameters that can be added to URLs to track the performance of marketing campaigns.
When a user clicks on a URL with UTM parameters, the parameters are appended to the URL in the browser’s query string.
Salesforce can use UTM parameters to track the source, medium, campaign, keyword, and content of website traffic, allowing marketers to reference their campaign efforts against leads, opportunities, and deals.
Why track UTMs in Salesforce?
In this digital age, you must be aware of how customers are finding you.
Without this insight, you’re leaving yourself vulnerable to wasting your time and money on marketing campaigns that don’t deliver meaningful results.
This is where UTM parameters come in. By adding UTM parameters to your leads in Salesforce, you can:
- track which marketing channels are responsible for generating deals
- identify the marketing channels that have the least impact on the pipeline
- pinpoint the landing pages that are most effective at converting visitors into leads
- reallocate budgets to the marketing variables that have a proven track record of generating leads and revenue
4 ways to track UTMs and attribution data in Salesforce
Let’s discuss four different ways to track UTMs and attribution data in Salesforce, along with the pros and cons of each method. We’ll start with the most effective method first and work our way down to the least effective method.
- Leverage attribution and integration tools
- URL parameter capture with web-to-lead forms
- Use the built-in features of form-building tools
- Use Google Tag Manager and custom code
1. Leverage attribution and integration tools
We understand that you may be sceptical of our objectivity, given that we are an attribution product that helps businesses automate their Salesforce processes, but hear us out.
Attribution tools automatically track UTM parameters and import the data into Salesforce, which eliminates the need for any manual data entry.
To demonstrate, let’s use Ruler.
Ruler is a marketing attribution that tracks the entire customer journey at the visitor level on a first-party basis, including the marketing source from each session, page views, UTM variables, Click IDs, and Cookie IDs.
When a user clicks on a UTM-tagged link and visits your website, Ruler records this data. It then syncs this information with Salesforce, associating it with the corresponding lead or contact record.
Here’s an example of a lead without UTM or attribution data in Salesforce:
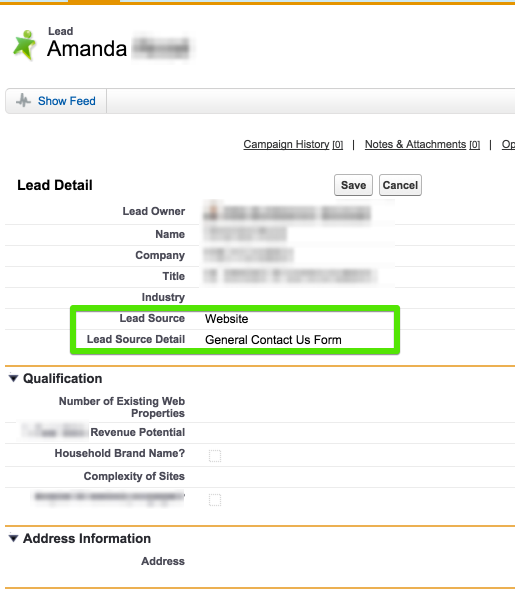
We can see the necessary contact details and the lead source, but there’s nothing about where the lead came from or what pages they looked at before converting.
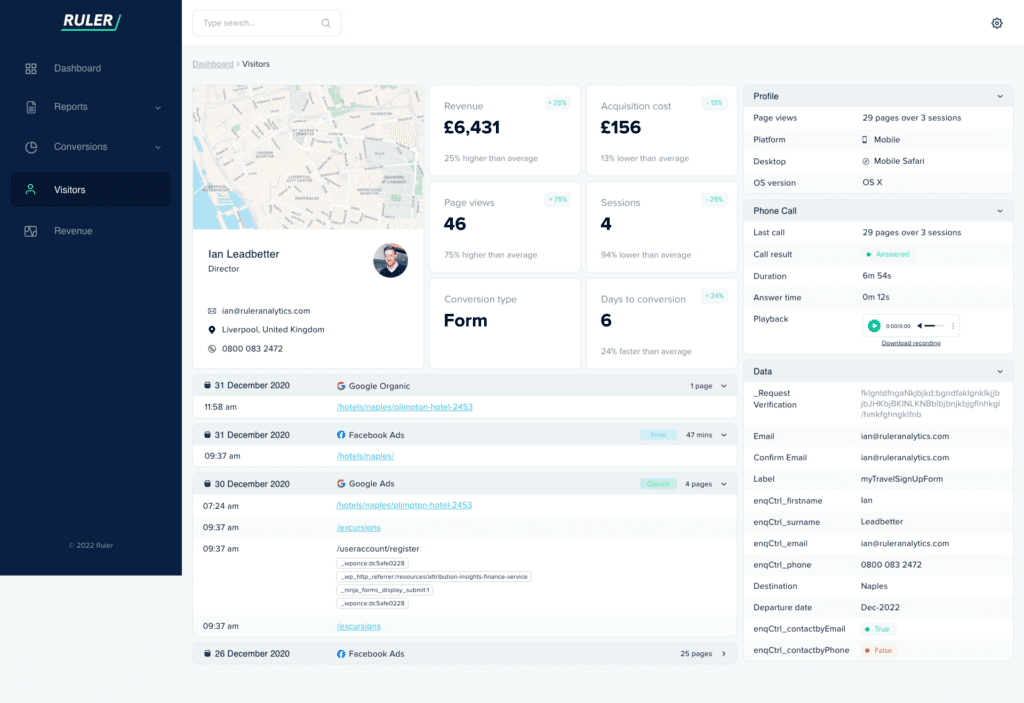
Now, let’s add attribution and UTM data from Ruler to compare:
We’re sure you can agree that there’s a vast difference between the two examples. After applying Ruler’s data, we can see that this lead converted after completing a PPC search and filling out a form on our marketing attribution page.
With visibility into this data, we can share it to create reports that track the number of leads, opportunities, customers, and revenue generated by each channel and/or campaign.
Pros of using attribution tools
- Ruler captures first-party data making it privacy compliant and fully consented.
- Considers phone calls and live chat enquiries, alongside web forms.
- Data is automatically pushed into Salesforce and attributed to leads and contacts, reducing administrative burden.
- Provides insights into the entire customer journey, from the first touchpoint to conversion.
- Allows you to attribute opportunities and revenue to specific marketing activities.
- Fosters better alignment between sales and marketing teams.
- Enables data-driven decision-making, allowing you to allocate resources optimally.
Cons of using attribution tools
- Ongoing maintenance is required to ensure that the integration remains functional.
- Attribution tools to come at an additional cost.
💡 Want to learn more about attribution? We’re here to help!
Attribution tools offer marketers a more convenient way to share UTM and marketing source data with Salesforce to generate a more complete picture of the customer journey. If you need help understanding or setting up UTM tracking in Salesforce, we’re here to help. Just book a demo, and we’ll walk you through the steps.
Book your demo slot here
2. URL parameter capture with web-to-lead forms
Web-to-lead form users, this tip is for you.
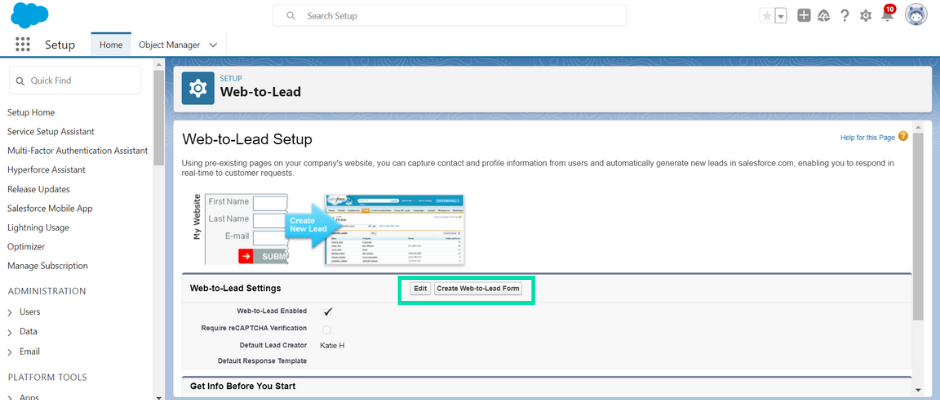
Salesforce offers an out-of-the-box feature called “Web-to-Lead”. It allows you to create web forms on your website to capture lead information.
Related: Complete guide to Salesforce’s Web-to-Lead Forms
When a user fills out the form, the data is sent directly to your Salesforce instance, creating a new lead record.
Salesforce Web-to-Lead form users can use hidden fields to capture UTM parameters and track the source, medium, campaign, and other information about how leads are coming to their website.
Adding hidden fields for UTMs to web-to-lead forms can be done in three simple steps.
- Create new fields in Salesforce
- Add new fields to your web-to-lead forms
- Edit the web-to-form code
1. Create new fields in Salesforce
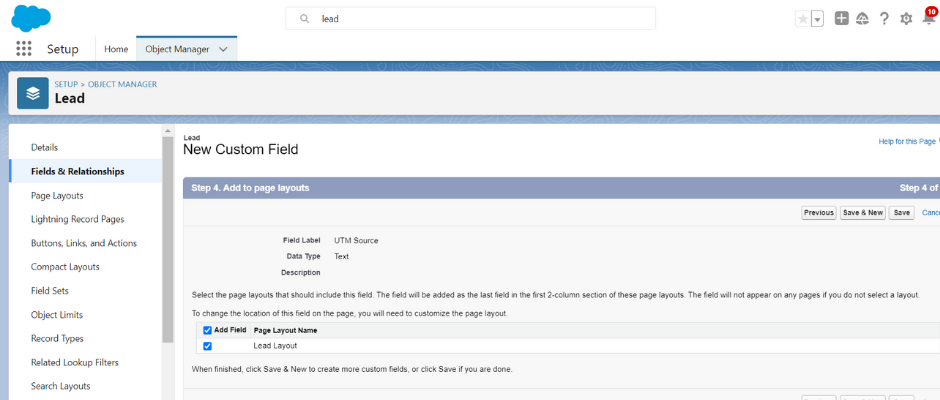
To begin, you must create five new custom fields in Salesforce: UTM Source, UTM Medium, UTM Term, UTM Campaign, and UTM Content.
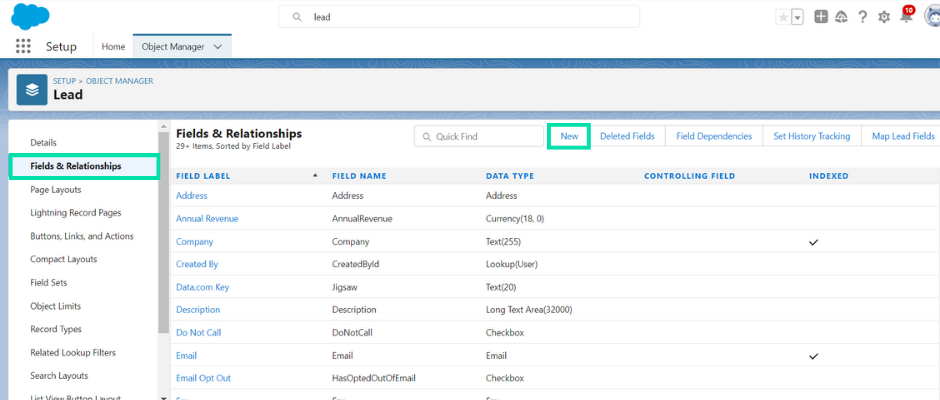
1. Navigate to Salesforce and click Setup.
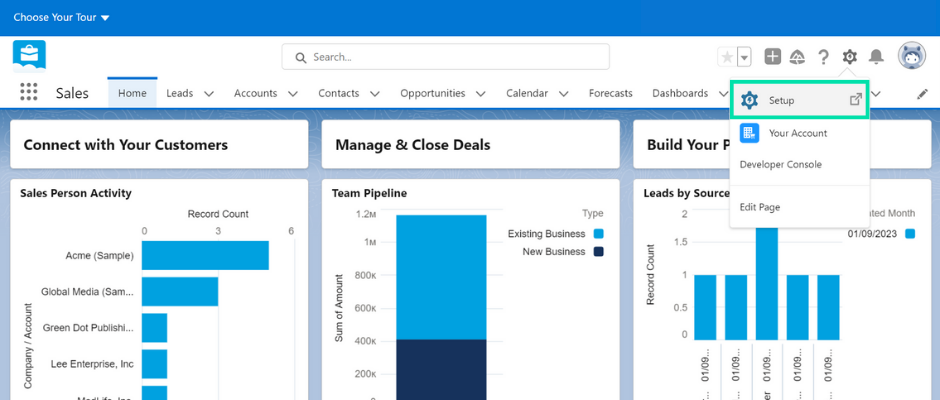
2. This will open a search bar. Enter the word lead and select the “Lead” option to navigate to Object > Object Manager.
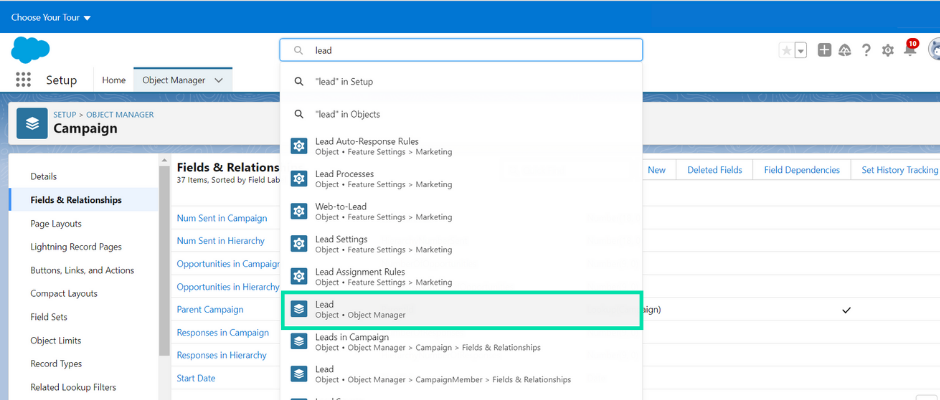
3. Select Lead Custom Fields & Relationships and click New.
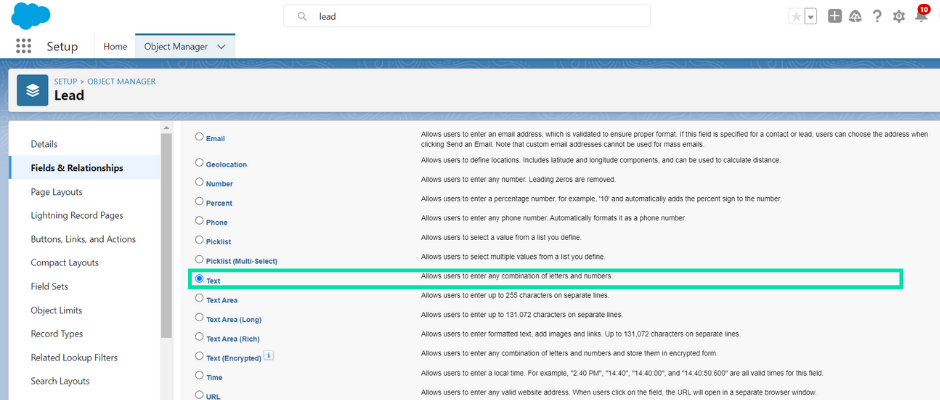
4. Choose field type Text and click Next.
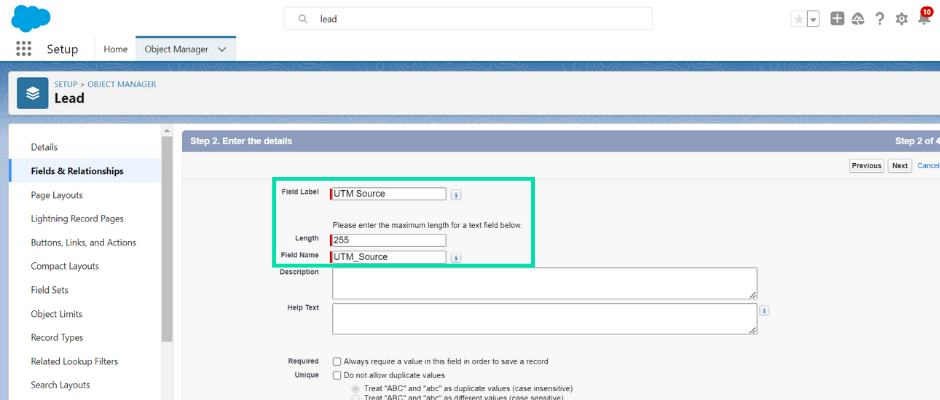
5. Set the field label to UTM Source and the length to 255 characters ( This is the maximum length for a text field in Salesforce.
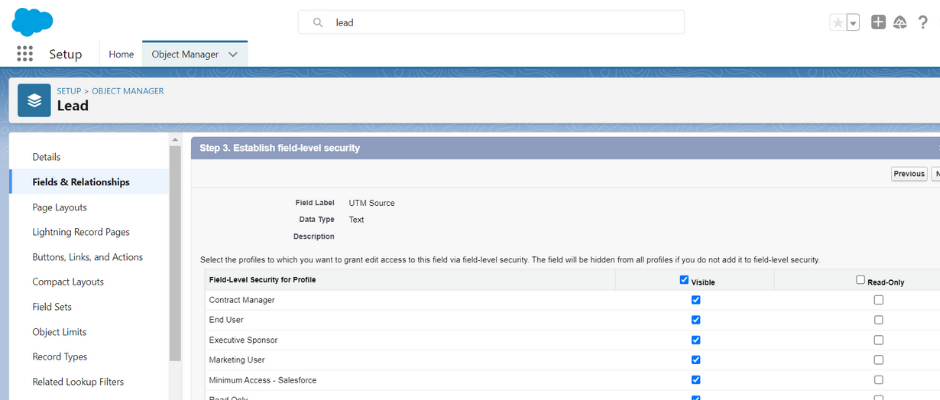
6. After entering the information above, click “Next” in the top right corner. This will take you to the field-level security settings, where you can control who can see and edit the values of this custom field. The specific options you should check or uncheck will depend on your Salesforce setup. If you’re not sure what to do, just leave the default options checked and click “Next.”
7. Finally, you’ll see a list of lead layouts where you can choose to add the field. What you choose here will depend on your Salesforce setup, but if you’re not sure, just leave all the boxes checked (which will make the field appear on all lead layouts) and click “Save.”
. Repeat this process four more times to create the following fields:
- UTM Medium
- UTM Term
- UTM Campaign
- UTM Content
💡 Pro Tip
This doesn’t just apply to new leads. You can also track the source/medium/term/etc. of each opportunity in Salesforce. You can do this in Setup > Opportunities – Fields and Setup > Accounts – Fields. Go to Setup > Lead – Fields again, and click the button Map Lead Fields. This will allow you to add the UTM fields to Account and/or Opportunity objects.
2. Add new fields to your web-to-lead forms
Now it’s time to add these fields to your Web-to-Lead forms. If you’re new to Web-to-Lead forms, we’ll show you how to build one from scratch.
If you already have a form built in Salesforce, you can simply edit it to include your new UTM fields. You’ll just need to update the JavaScript code on your website to capture data in the new fields.
Here’s how to create a new Web-to-Lead form:
1. Go to the Salesforce Setup page and search for “Web-to-Lead”.

2. Click on the “Create Web-to-Lead Form” button.
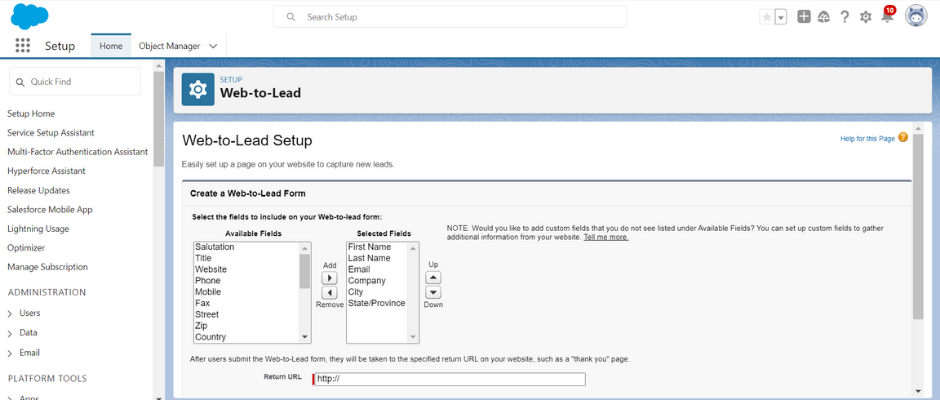
3. Choose your web form fields, including the UTM fields you’ve just created in step 1.
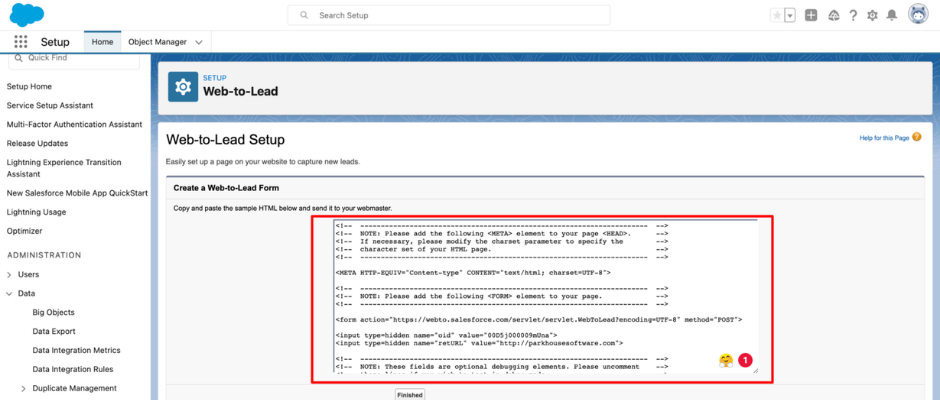
4. Click on the “Generate” button and copy the code you see in the box.
3. Edit the web-to-form code
To hide the UTM fields on your website, you will need to make some adjustments to your code before adding it.
1. Paste the code you’ve just copied into Microsoft Word or Google Docs.
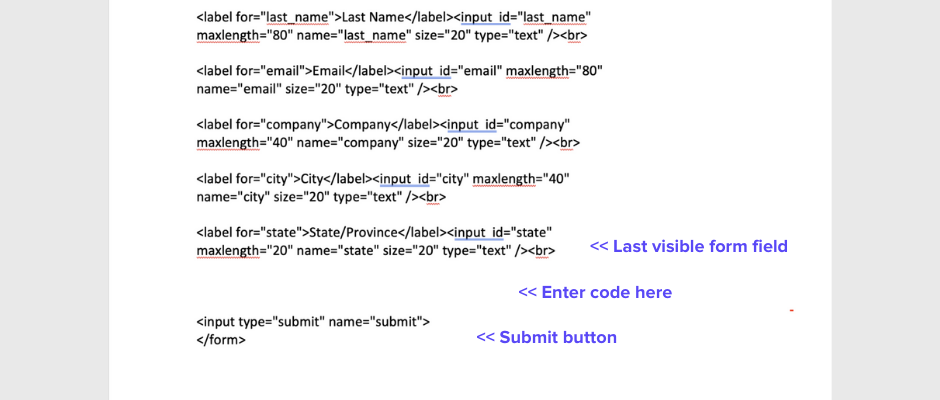
2. Insert the following code snippet into the code you received from Salesforce. Paste the code below the last field that you want to be visible on your form but above the Submit button.
<input type=”hidden” name=”XXXXXXXXXXXXXXX” id=”XXXXXXXXXXXXXXX” value=”[utmsource]”>
<input type=”hidden” name=”XXXXXXXXXXXXXXX” id=”XXXXXXXXXXXXXXX” value=”[utmmedium]”>
<input type=”hidden” name=”XXXXXXXXXXXXXXX” id=”XXXXXXXXXXXXXXX” value=”[utmterm]”>
<input type=”hidden” name=”XXXXXXXXXXXXXXX” id=”XXXXXXXXXXXXXXX” value=”[utmcampaign]”>
<input type=”hidden” name=”XXXXXXXXXXXXXXX” id=”XXXXXXXXXXXXXXX” value=”[utmcontent]”>
For example, you’ll want to make the fields for name, company, and email address visible so that your leads can enter their information, but hide the fields for UTM source, channel, campaign, and so on.
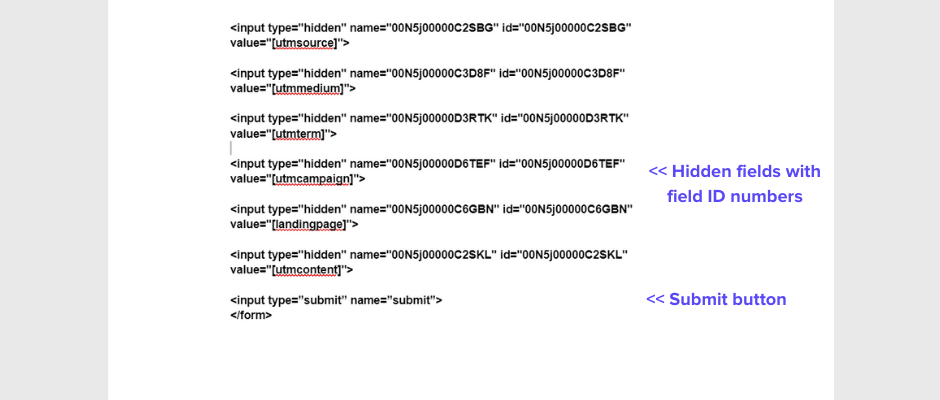
You’ll need to fetch the ID numbers of the customs fields you made earlier and replace the variables (I.e. the XXXXXXXXXXX) in the form. The easiest way to do this is to select your fields from the list of fields in Salesforce. Once you’re on the Field Detail page, look at the URL in your web browser and copy the random series of numbers and letters you see.
If set up correctly, your code should look something like this:
Once you’ve finished making edits to the Web to Lead form code, you can add it to your website.
Pros of hidden UTM fields in Web-to-Lead forms:
- It’s free to set-up.
- They are easy to manage.
Cons of hidden UTM fields in Web-to-Lead forms:
- You only get information on leads who have clicked on a UTM click, so you probably won’t get much attribution information for organic channels like organic search, social, and referrals.
- Only considers the last-touchpoint in the user journey.
- Doesn’t account for phone calls or live chat enquiries.
- UTMs can be lost when a visitor clicks on a link and then navigates to another page without making a conversion.
3. Use the built-in features of form-building tools
What if you are using a dedicated form-building tool, such as Gravity Forms or Jotform, to power the forms on your website instead of using Web-to-Lead forms?
Fortunately, most dedicated form-building tools have a built-in way to capture UTM parameters. You can use an automation tool like Zapier to send this to your Salesforce CRM.
Every form-building tool has a different setup process, so you will need to consult the documentation for your form-building tool to learn how to hide your UTM fields.
However, the pros and cons of hiding UTM fields in forms are still the same, regardless of whether you are using Salesforce Web-to-Lead forms or a dedicated form-building tool.
First, UTM parameters can be lost if a visitor clicks through to another page before submitting the form. Second, they only capture data from one touchpoint in the customer journey and don’t provide a complete view of the customer’s interests and needs.
4. Use Google Tag Manager and custom code
If you use Google Tag Manager on your website, you can use Variables to store the UTM parameters that a visitor arrives within a cookie in their browser.
Then, you can use custom code to get the data from the cookie and write it into hidden fields in your forms. This data will then be sent to Salesforce when the form is submitted.
It involves adding the Persist Campaign Data tag template to your Google Tag Manager account and configuring it to capture the UTM parameters from your URLs.
The steps involved in using this method are too numerous to list here, but you can find step-by-step instructions in this article: How to capture UTM parameters in a cookie.
Pros of using Google Tag Manager and custom code:
- Google Tag Manager is free to install.
- GTM makes it easy to collaborate with others.
Cons of using Google Tag Manager custom code:
- Requires expertise in Google Tag Manager and the ability to modify code.
- It doesn’t consider call or live chat conversions.
- If the custom code is not implemented correctly, it can cause tracking problems.
Need help tracking UTMs in Salesforce?
Now that you know how to capture UTMs in Salesforce, you can start tracking the performance of your marketing campaigns and demonstrate your impact on revenue more confidently.
Don’t forget. A tool like Ruler Analytics can automate the process of sending UTM and attribution data to Salesforce for forms, phone calls, and live chat conversions. This can save you a ton of time and provide a holistic view of your customer journey and marketing effectiveness.
See exactly how Ruler enriches your Salesforce with attribution data, or book a demo to see it in action.