
Microsoft Dynamics is a widely popular customer relationship management tool used by companies on an international scale.
Finding the CRM platform that works with you and your company isn’t easy, but many stick with Dynamics 365 due to its many benefits.
Flexibility, ability to connect to cloud networks, and advanced integrations with other Microsoft tools are all part of the package.
To start collecting data on leads, Dynamics 365 users can create webforms to embed within their website.
They can then connect the form to Dynamics. Once a visitor inputs their information, Microsoft Forms and Dynamics 365 sync together to transfer this new lead into your CRM.
Here’s our guide on how to use Microsoft Dynamics CRM webforms for lead generation.
Using Microsoft Dynamics CRM webforms for lead generation
Microsoft Forms is ideal for syncing webform data you’ve collected on leads into your 365 account. How to create and embed a webform in Microsoft Forms:
- In Microsoft Forms, click ‘My Forms’ at the top and then select the New Form option.
- Create your form by editing fields that represent the data you’d like to collect. You can configure settings so certain necessary fields are required – such as Name, Email and Phone number.
- Once your form is ready, it needs to be published. Click the Share button on the navigation bar. Make sure your sharing preferences are changed to ‘Anyone with the link can respond’.
- You can now embed the form on your site. From the Share tab, select the </> button at the bottom to generate an iFrame code for your form. This iFrame code means your website can display an interactive document within your website. Copy the code provided.
- On your site editor, paste the iFrame code into your preferred landing page – where you’d like visitors to see the form.
- Publish the site, and you’ll see your form is now ready for visitors to fill their data.
How to connect your webform with Dynamics 365
To connect Forms with 365, it’s best to use Microsoft Power Automate to create a ‘flow’.
- Select the Create option on the left to start setting up your flow in a new page.
- From the options, click ‘Automated Flow’.
- Name the flow – something related to the process involved.
- You’ll be prompted to choose your flow’s trigger. Click the Microsoft Forms option that says ‘When a new response is submitted’.
- Click the blue Create button at the bottom. You can then edit the flow settings.
- Select the ‘Form id’ you’d like to link from the drop down options.
- Add a new flow step by clicking the + button underneath. A search bar will appear – type “Get response details”. Select your relevant Form id again and click ‘Add dynamic content’.
- Choose ‘List of response notifications’ from the options provided.
- Click the + button again and select ‘Create a new record’. Choose the 365 Environment you’d like the data to go to. In the Entity Name box, type and select ‘Leads’.
- Complete the form to fill out the topics and data you’re collecting.
- Once your flow is set up, Microsoft Forms will send any lead data to your 365 CRM.
Optimise your lead generation efforts with Ruler Analytics
The above guide on connecting webforms with 365 can take some time to implement, especially if you’re not familiar with HTML and web editors. A better solution is to use Ruler Analytics.
Ruler is a marketing attribution tool that syncs the data you need between your favourite apps and CRM platform.
It takes into account that managing marketing data yourself is a timely task (and many of us don’t have the luxury of extra time)!
Rather than streamlining all your customer journey data manually, Ruler takes care of the groundwork.
Related: How to view full customer journeys in Ruler
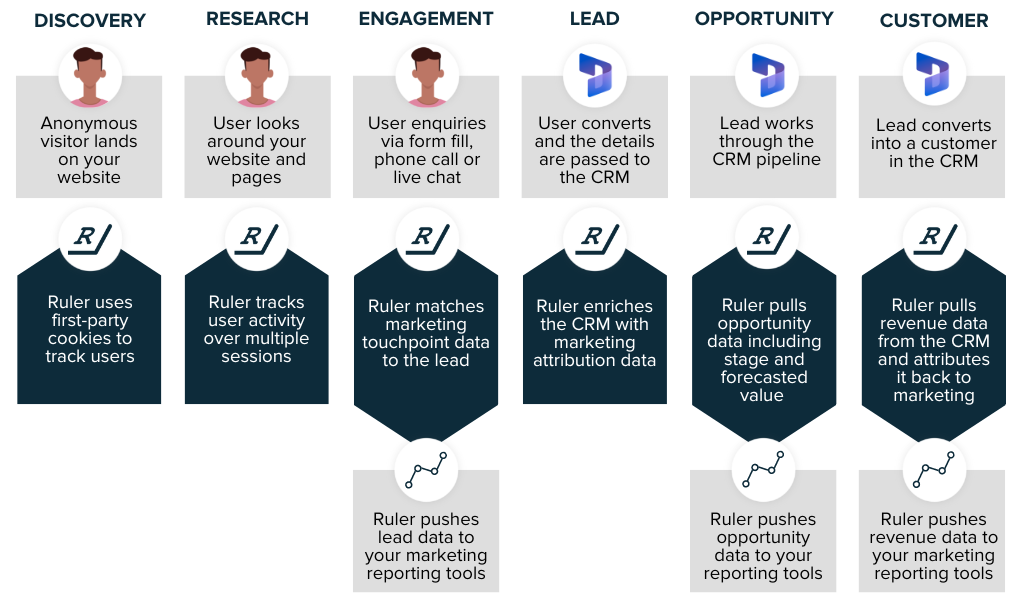
It connects your data between apps, allowing you more time to analyse your efforts. Ruler also tracks the entirety of each lead’s journey with you, collating data on every marketing touchpoint made before a visitor converts into a lead.
Try your free Ruler Analytics demo today
Ruler Analytics is here to streamline entire integrations between all your favourite CRM and marketing apps.
A one-stop solution that can achieve all of the above and more, Ruler Analytics connects and fills the gaps within your marketing data.
Pulling this marketing data together to develop a comprehensive view of how your campaigns are performing, Ruler can drastically enhance your ROI with in-depth reports.
Related: How Ruler attributes revenue to your marketing
To explore how Ruler could work for you and your teams, book a free demo with us today. If you have any questions, you use our instant chat tool in the bottom right hand corner.
Related articles:
How to create and attribute lead source in Microsoft Dynamics
Connect Microsoft Dynamics with Google Analytics and drive more qualified leads